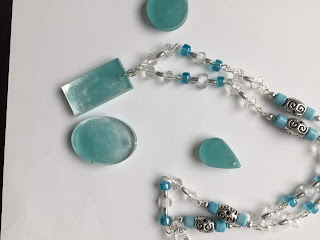
3 Resin Necklaces To Make & Sell
Resin art is becoming more and more popular and the inspirations online is endless for it! From really cool mountain scenes to simple little flowers, you can make any charm you can think of.
If you are just starting to dip your toes into the resin art hobby, your probably feeling two things, excitement and the overwhelming butterflies that are making it difficult to decide what to start with.
Here are 3 really easy and simple charm designs to help you get into making things with resin!
!*!* Make sure your read the instructions that come with your bottle as there are many different types and many are toxic!*!*
Wave/Cloudy Charms
These charms are super easy to make, you just need a little bit of blue/green coloring. I use soap dye powders for my colored resin projects. It's important to note if you are using soap dyes, you only need a teeny tiny amount of powder. Too much dye and your resin won't set right.
To start this project make sure you have a clean area and read the instructions for your resin.*
STEPS
1 - Fill half the mold with clear resin.
2. Add color to your resin.
3. Fill the rest of the mold with the colored resin and lightly swirl the resins together in the mold.
NOTE****
For the charms in this post I had mixed the dye in really well... when I made another batch for another project I didn't mix them as much and I think they turned out much better. So don't be worried if there are still little bits of unmixed dye in your resin, the finish still looks really pretty!
Rock Charms
These charms are super easy, no die(unless you choose to) just put a few small rocks in the mold and pour on the resin. I also added silver sparkles in mine just to make it... well sparkle more!
STEPS
1.Fill Mold with rock pieces and sparkles.
2. Fill mold with resin
...
3. Let it set and make it into a beautiful piece of jewelry! It's just that easy.
Flower Charms
These charms again, super easy! You just need fired flowers or fake flowers and once they are in the mold, just pour resin over it. You may fin the flower floats to the top of the charm, I just had a little pin and pushed it down every now and then.
You could also split the project into 2 pours, on the first pour fill half the mold with the flower. Let set for 8+ hours then fill the rest of the mold with your second pour. Splitting your pours will make the flower set in the center of the charm nicely.
STEPS
1.Place flower & additional leaves
2. Pour resin
3.Let set & make into some pretty jewelry!
I hope you got some inspiration from these tutorials! If you want more DIY inspiration follow me via Facebook or Instagram @s.b.eadedjewelry


Comments
Post a Comment